

Remember that magnetic board project I mentioned a few posts ago ? Well, today I'm finally posting the overdue instructions on how to create one of your own. But first a little story...
Over a year ago, I bought a magnetic poetry kit for my daughter as a birthday gift, only to realize that the magnetic board they sell at various stores cost a little fortune and frankly, are not the prettiest suckers in the world. White board, bland, boring. Grey board, bland, boring. Not fit for a teen's funky room.
So I started thinking about a creative alternative. The kit contained 500 words so the board needed to be at least 16x20 inches, which would make it easy to place on any wall. Weeks went by but I wasn't struck with any kind of ingenious idea. So, in the meantime, I decided to get a poetry kit of my own thinking how much fun it would be to have a some poetry right smack in the middle of the hallway.
 One day, as I was heading back home, I found 2 laminated picture frames placed in a box out on the sidewalk. They were obviously meant for trash and suddenly creative lightning struck at last. As I reached for them to have a closer look, I saw they would be the perfect size for the poetry kits that were waiting to be exposed.
 Like a giddy school girl, I strutted back home with my soon-to-be-fancy finds. I thought about what colour I wanted the boards to be and then I remembered reading something about magnetic paint and set out to find some at the hardware store. I was ready to start my magnetic board project.
STEP 1: Find a laminated board, preferably with a boring picture that way you won't feel any guilt when it comes time to splatter the thing with paint. You can pick the size you prefer. It could be one big one, like a 16x20 or 2 or 3 smaller ones like 8x10.

Laminated frames were all the rage in the 80's and 90s. I'm sure you could ask around and find someone who has one in their basement. With a little good timing and luck, you might even find one in the trash!
STEP 2: Clean the frame and surround the edges with masking tape. I used soap and water and then a few squirts of Windex. I know. I know. It was my excuse for being able to spray on a flat surface.
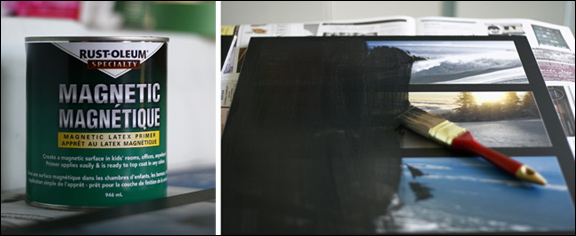
STEP 3: Take a paint brush and cover with magnetic paint. The product says 3 layers, but I wanted to apply a colored paint over the magnetic paint, so I went for 5 layers. I used a paint brush even though it's recommended to use a roller brush. But if I had to do this project again (which I won't. You know, been-there-done-that kinda thing!) I would use a roller just for the sake of creating a smoother surface.
 Let each coat dry well (about 1 to 1½ hour) between each new application. And if you're planning to apply a coloured paint over the magnetic paint, let the latter dry thoroughly for about 24 hours.
Once you've applied all your magnetic and colored paint, gently remove the masking tape around the edges.
I would recommend that you wait a few days before placing the magnetic words on the board, particularly if you chose to cover the magnetic paint with colored paint. If the colored paint hasn't hardened enough, you risk having the magnetic words stay stuck on the board and when you remove them, the colored paint will peel off. Trust me... I speak from experience!
I have to say, having a poetry board in the hallway is a lot more fun than I expected. Everybody who comes to my home stops right in front of it (well, it's not like they could miss it!) and can't help to start placing words together, creating peculiar and joyful poetry.